
Laravel
The Complete Beginner's Guide

Laravel is a powerful and popular PHP framework that has gained significant traction in the web development community. Known for its elegant syntax, powerful features, and developer-friendly environment, Laravel makes it easy to build scalable and maintainable web applications. This article provides an in-depth overview of Laravel, highlights its strengths, explains how it works, and provides a step-by-step guide to help you get started with Laravel development.
Why choose Laravel?
- Elegant Syntax: Laravel provides a clean and expressive syntax that enables developers to write code that is both readable and efficient, improving productivity and reducing development time.
- MVC Architecture: Laravel follows the Model-View-Controller (MVC) architectural pattern, promoting separation of concerns, code reusability, and maintainability. This structure improves the overall organization and readability of the codebase.
- Extensive Documentation: Laravel has extensive documentation with detailed explanations and examples for each feature, making it easy for beginners or experienced developers to select and implement various features.
- Build-in Features: Laravel includes a wide range of built-in features, including authentication, routing, caching, session management, and database migration. These features remove the need for developers to write repetitive code and allow them to focus on core business logic.
- Community Support: Laravel has a vibrant and active community that contributes to its ecosystem by developing and maintaining various packages, libraries, and plugins. This support system ensures that developers have access to a wide range of resources and solutions to common problems.
How Laravel Works
Laravel works on the Model-View-Controller (MVC) architectural pattern, which improves code organization, separation of issues, and reusability. Let's see how Laravel uses the MVC pattern to make the development process easier:
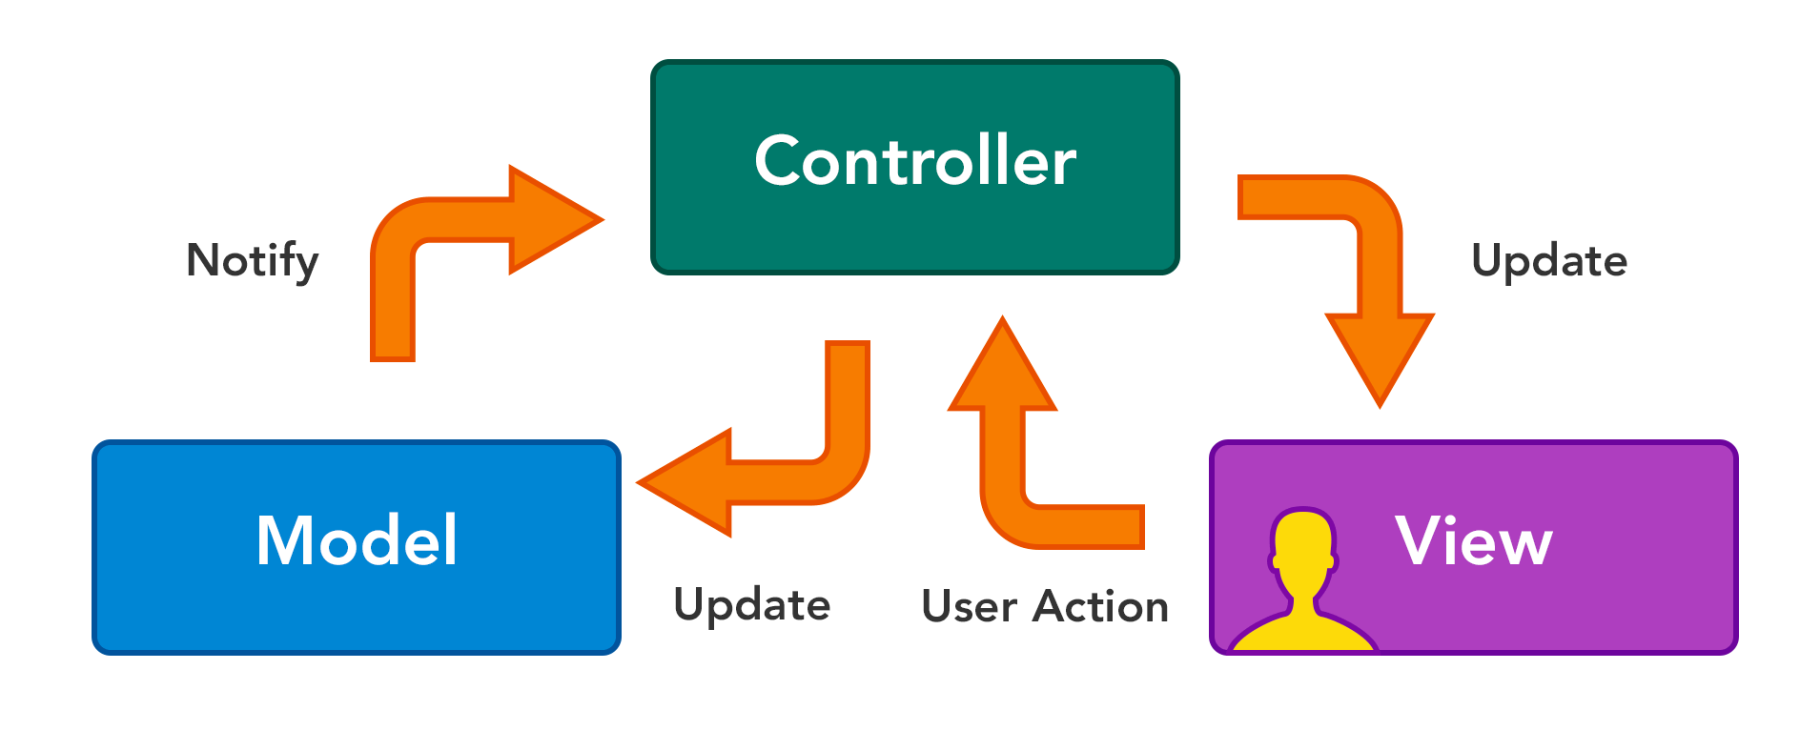
Model: The Model represents the data of your application. It is responsible for handling interactions with the database, such as retrieving, updating, or deleting data. Think of it as the "data manager" that knows how to talk to the database and perform actions on the data.
View: The View is what the user sees and interacts with. It is responsible for displaying information to the user in a visually pleasing way. Think of it as the "user interface" or the "web page" that shows the data from the Model to the user.
Controller: The Controller acts as the middleman between the Model and the View. It receives requests from the user (e.g. when they click a button or submit a form), and it decides what to do with that request. It asks the Model for the necessary data, performs any required operations or calculations, and then decides which View to show to the user.
Routing: Redirecting User Requests to the Right Place
In Laravel, routing is the mechanism that determines how incoming requests from users are handled. Think of routing as a map that connects different URLs (or routes) to specific actions in your application.
When a user enters a URL in their browser or interacts with your application, routing helps direct that request to the appropriate code that will handle it. For example, if a user visits "/home" on your website, the routing system will know which code (a controller method) is responsible for generating the content of the home page. Routing allows you to define different URLs and specify the corresponding actions to be performed.
By modifying the routes defined in the routes/web.php file, you can create routes for different pages or actions in your application.
For example, let's say you want to create a route for a "Contact Us" page. You can add the following code to the routes/web.php file:
Route::get('/contact', function(){
return view('contact');
});
Database: Storing and Retrieving Data
In the context of Laravel, the database is where you store and retrieve data for your application. It acts as a persistent storage system that holds information like user details, product data, or any other data your application needs to function.
By using Laravel's database features, you can perform tasks like creating tables, inserting data, querying data, and updating or deleting records. Laravel's database migrations allow you to version and manage your database schema changes effectively.
Get Started with Laravel - Step-by-Step Guide:
Installing Composer:
Before getting started with Laravel, you'll need to install Composer, a dependency manager for PHP. Follow these steps to install Composer:
- Visit the Composer website at https://getcomposer.org/ and download the installer appropriate for your operating system (Windows, macOS, or Linux).
- Run the installer. On Windows, it will be an executable file; on macOS or Linux, it will be a shell script.
- Follow the instructions provided by the installer. The installer will guide you through the installation process and set up Composer on your system.
- After the installation is complete, open a new terminal or command prompt window and type composer. If you see the Composer logo and a list of available commands, it means Composer has been successfully installed.
Installing Laravel:
-
Create New Laravel Project: Now that Composer is installed, you can use it to Create New Laravel Project. Open a terminal or command prompt window and run the following command: “ composer create-project laravel/laravel example-app ”
-
Change Directory: Once you have created a project, make sure to change the directory to your project directory before executing any further commands. You can navigate to the project directory by running the following command: “ cd your-project-name ”
- Run Your Application: Once you have navigated to your project directory, you can start the application by executing the following command: “ php artisan server “
- Preview Your Application: Once your application is started you can type this URL ( http://localhost:8000/ ) to see your application in action.
Configure the Database:
Laravel uses a default database configuration that uses SQLite, a lightweight database system. However, you can configure Laravel to use other database systems like MySQL or PostgreSQL.
To configure the database, open the .env file located in the root directory of your Laravel project. Inside this file, you'll find various configuration options, including the database connection settings.
Update the following variables in the .env file to match your database settings:
DB_CONNECTION=mysql
DB_HOST=127.0.0.1
DB_PORT=3306
DB_DATABASE=your_database_name
DB_USERNAME=your_username
DB_PASSWORD=your_password
Replace your_database_name, your_username, and your_password with your actual database credentials.
By updating these variables, Laravel will use the specified database system.
Conclusion:
Laravel is a powerful PHP framework that simplifies web application development. Its elegant syntax, comprehensive documentation, MVC architecture, rich feature set, and supportive community make it a preferred choice for developers.
In this article, we explored the strengths of Laravel and provided a step-by-step guide to get started. By installing Composer, creating projects, defining routes, creating views, generating controllers and models, and configuring the database, you can begin building scalable and maintainable applications.
With Laravel, you have the tools and resources to bring your web development ideas to life. Embrace the possibilities and enjoy coding with Laravel!